

I love this time of year! It’s so fun to create a haunting mood in my home with eerie décor, spooky tunes and so many candles. Goodwill® has the best stuff for decorating during this season because there’s so much variety that, with a few little updates, can feel completely magical. The potion station I’m building today could serve as the perfect spot to put out candy for trick-or-treaters or to set a mood in the entryway of your home during a Halloween party. You could also look for larger jars and bowls to serve real food during your party. Here are some tips for making an authentic-looking apothecary!
The Steps
First, check Goodwill for some materials. I like to look through the glassware, kitchen and book sections because I find items there that look like actual props from the set of Hocus Pocus (and that’s basically my gauge for good Halloween décor). Jars and bottles, especially if they have cork stoppers, are really great finds. They’re ideal for Halloween haunting but can also transition well during the holiday season and throughout the rest of the year. Even if they don’t have a cork in the store, you can save one from a bottle of wine and use that to complete the look.
Silver, copper and pewter dishware are perfect for this theme, too. When they’re thrifted, you don’t have to choose between real metal or a manageable price tag — you can have both! Plus, when you find what you need at Goodwill, you’re helping their organizations provide support services — including childcare, financial education, transportation, youth mentoring and other career services — that enable people from all backgrounds to obtain and maintain economic independence and increased quality of life.
Do you feel like you’ve seen that candlestick holder before? You probably have. I bought it from a Goodwill store in Maine about five years ago, and we still use it for everything from Halloween décor to Christmas mood lighting. We even use it when the power goes out in snowstorms! The mug and tiny tray are nice additions, too, because they balance out the metallic look of the candlestick holder and corral the smaller jars. Don’t forget to look for old books (or age some not-so-old, thrifted books) when you’re there. Stacking tomes brings height to your display, and with carefully chosen titles, they can mimic spell books. I also added a little burlap under my tray to match the jar labels, cork and book pages. This could be any cloth that looks like it might have a little history, though.
To take my display to the next level, I decided to add a couple of labels. I wanted a bit of a mismatched look, so I didn’t label everything, but you certainly could if you were using these containers to serve food and drinks at a party. The labels were so easy, too. Here’s what I needed:
Materials:
- Cardstock paper
- 2 tea bags (Not herbal tea. I used Earl Grey.)
- Cooling rack
- Drip pan
- Glue (Elmer’s or ModPodge would be perfect.)
- Scissors
- Paintbrush
- Fountain or rolling ball pen
Step 1: Cut the cardstock to the size you’ll need for labels. Don’t worry about the cuts being perfectly level. You want them to look worn, so you can even snip some little Vs out of the edges.
Step 2: Boil ½ a cup of water and then let the two tea bags steep in it for at least five minutes.
Step 3: Place the cooling rack over the drip pan and put the labels on top. Brush a generous amount of tea on the whole piece of paper. Let it pool a little in places to create a darker splotch that brings a lot of character.
Step 4: Put that set-up (drip tray, rack and paper) into the oven and turn it on its lowest setting. Leave it in for only a few minutes, keeping a close eye on its drying progress. Take it out the moment it appears dry. Do not let it burn.
Step 5: Remove the paper from the oven and draw on your label.
Step 6: Brush a thin coat of glue on the back of the label and then stick it to the jar. You’re done!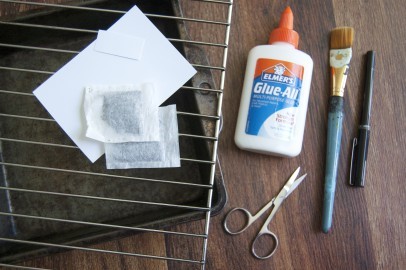
Now that you’ve got some props to work with, it’s time to add potion ingredients. I channeled my inner herbalist when I put together my display because witches would also need to do a lot of foraging before they could begin their work. Don’t worry about filling every container to the brim. If it’s
a frequently used apothecary, some ingredients will be running low.
The two places I looked for ingredients were in my kitchen and my yard. Inside, I found spices, iced tea and a candle (the white corked jar) that passed as ingredients ready to be added to a concoction. Outside, I picked goldenrod (the yellow flowers and “witch hazel boughs”) and then separated it into two different jars. Don’t forget about dried flowers. The lavender and “nightshade petals” were dried from the garden earlier in the summer, and they’re perfect. Don’t you always imagine a lot of dried flowers hanging from the ceiling of a witch’s lair?
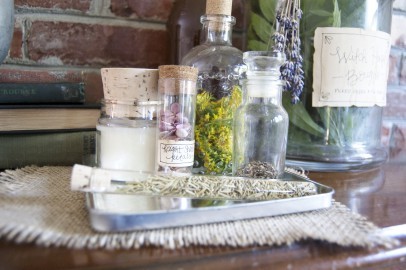
If I needed anything else to round out my display, I’d love to try grape juice or wine in a decanter, ginger root in a dish or a jar of toadstools. Don’t forget to illuminate the area with candlelight for a magical glow. Have so much fun putting together your apothecary and mix up a little Felix Felicis for me, would ya? Find your closest goodwill and get mixing!


